
Introduction: The Joy of Indoor Plant Propagation
If you’ve ever felt the thrill of watching a tiny cutting transform into a lush, vibrant plant, you know the sheer joy of indoor plant propagation. Not only does it provide a fulfilling way to expand your green collection, but it also allows you to save money and share the love of plants with friends and family. As autumn approaches, the changing season presents a unique opportunity for propagation, where cooler temperatures and shorter days create a conducive environment for growth.
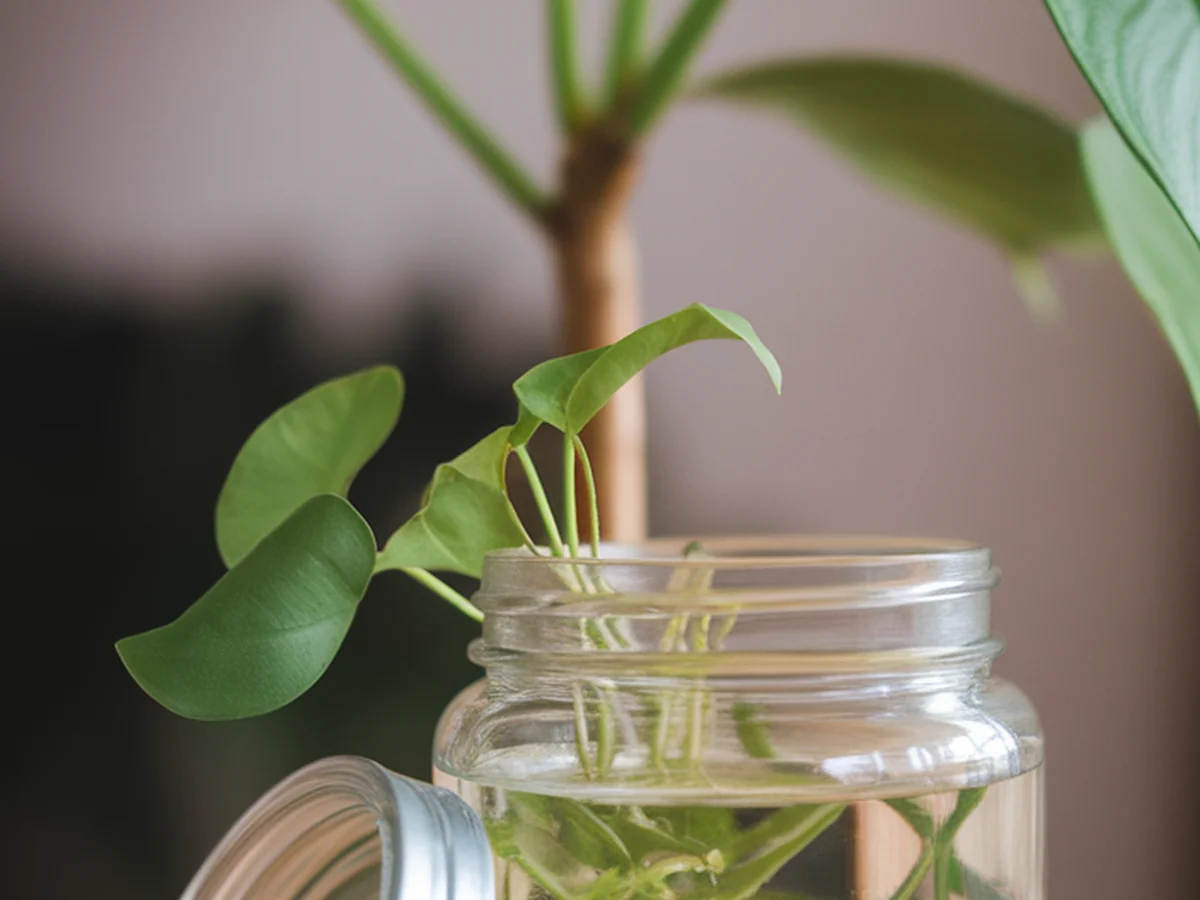
I vividly remember the first time I successfully propagated my pothos plant. I took a cutting in early autumn, placed it in a jar of water, and watched as roots began to sprout within weeks. It was a magical moment that ignited my passion for indoor gardening. That experience taught me the importance of timing and technique, and I’ve since honed my skills to share with fellow plant lovers.
In this article, we aim to empower you with essential insights and techniques for mastering indoor plant propagation this autumn. Whether you’re a beginner or looking to refine your skills, you’ll find valuable tips and guidance to help you succeed.
“Creating a cozy reading nook is all about maximizing comfort in a small space. It’s about intentional design that serves both function and feeling.”
– Interior Design Magazine
Understanding the Basics of Plant Propagation
Plant propagation is the process of creating new plants from existing ones. This practice is essential not just for expanding your indoor garden but also for maintaining the health and vitality of your plants. By propagating, you can rejuvenate older plants, introduce new varieties, and even preserve rare species.
There are several methods of propagation, each suited to different plant types and individual preferences. The most common methods include:
- Cuttings: Taking a portion of a stem, leaf, or root and allowing it to develop roots.
- Division: Splitting a plant into smaller sections, each with roots and foliage.
- Layering: Encouraging a stem to root while still attached to the parent plant.
- Seed propagation: Growing new plants from seeds, which can be more challenging and time-consuming.
Choosing the right method is crucial, as some plants thrive better with certain techniques. For instance, succulents often propagate well from leaf cuttings, while ferns may prefer division. Many misconceptions exist surrounding propagation; for example, some believe that all plants can be propagated through cuttings, which is not the case. Understanding the basics will set a solid foundation for your propagation journey.
Choosing the Right Plants for Autumn Propagation
As the days grow shorter and temperatures cool, certain indoor plants become ideal candidates for propagation. Here are some that thrive during autumn:
- Pothos: Known for its resilience and fast growth, pothos can be easily propagated through cuttings.
- Spider plants: Their offshoots, or “pups,” can be detached and rooted in soil or water.
- Succulents: Many varieties, such as jade plants and echeveria, can be propagated from leaf cuttings.
- Snake plants: This hardy plant can be divided into sections for propagation.
When selecting a plant for propagation, consider its growth patterns and seasonal dormancy. Healthy plants with strong growth signals are more likely to root successfully. Before propagating, check for signs that the plant is ready, such as:
– New growth or leaves
– Healthy, firm stems
– Absence of pests or disease
Assessing plant health is essential for ensuring a successful propagation experience this autumn.
Gathering Your Propagation Tools and Materials
Before diving into propagation, it’s important to gather the right tools and materials. Here’s a list of essentials you’ll need:
- Scissors or pruning shears: Sharp and clean cutting tools are critical for taking cuttings.
- Pots: Choose pots with drainage holes to prevent waterlogging.
- Soil: A well-draining potting mix is vital for rooting success.
- Rooting hormone: This optional material can enhance root development in cuttings.
Using clean, sterilized tools is crucial to prevent disease transmission. For soil, consider using a mix that suits your plant type; for instance, succulents thrive in a gritty, well-draining mix, while tropical plants prefer a moisture-retentive blend.
Optional materials can enhance your propagation efforts. Humidity domes create a greenhouse-like environment for cuttings, while grow lights can provide the necessary light levels, especially in low-light conditions. Moisture meters can help monitor soil moisture levels, ensuring your cuttings don’t dry out or become waterlogged.
Step-by-Step Guide to Successful Propagation Techniques
Now that you have your tools ready, let’s explore the various propagation techniques in detail.
Water Propagation
Water propagation is a straightforward and visually rewarding method. Follow these steps:
1. Taking Cuttings: Use clean scissors to snip a healthy cutting, ideally 4-6 inches long, just below a leaf node.
2. Placing in Water: Place the cutting in a clear container filled with water, ensuring that at least one node is submerged.
3. Caring for Cuttings: Change the water every few days to prevent stagnation. Place the container in bright, indirect light.
4. Root Development: Watch for roots to develop, which may take a few weeks. Once they’re 2-3 inches long, it’s time to transfer to soil.
Soil Propagation
Soil propagation allows cuttings to root directly in a suitable medium:
1. Preparing Cuttings: Just like with water propagation, take a healthy cutting.
2. Planting Directly: Dip the cut end in rooting hormone (optional), then plant it in a pot filled with moist potting mix.
3. Watering: Water the soil lightly, ensuring it’s moist but not soggy.
4. Creating Humidity: Cover the pot with a plastic bag or a humidity dome to maintain moisture levels.
5. Monitoring Growth: Keep the pot in a warm area with bright, indirect light until new growth appears.
Division Methods
For clumping plants, division is a great way to propagate:
1. Timing: Divide plants during their active growth phase, ideally in the spring or autumn.
2. Removing the Plant: Gently take the plant out of its pot and shake off excess soil.
3. Dividing the Roots: Use clean scissors to cut through the root ball, ensuring each section has roots and foliage.
4. Replanting: Place each division into its own pot with fresh soil and water thoroughly.
Layering Techniques
Layering is a more advanced method but effective for certain plants:
1. Selecting a Stem: Choose a healthy, flexible stem and make a small cut or notch about halfway through.
2. Burying the Stem: Bury the notched part in soil while keeping the tip above ground.
3. Root Development: Water the buried section and wait for roots to form before cutting it away from the parent plant.
Creating the Ideal Environment for Propagation
Creating the right environment for propagation is crucial for success. Here are some factors to consider:
Light
Different plants have varying light requirements. For most cuttings, bright, indirect light is ideal. Avoid direct sunlight, which can scorch tender leaves. If natural light is limited, consider using grow lights to supplement.
Humidity
Humidity plays a significant role in the rooting process. Many cuttings benefit from higher humidity levels, which can be achieved using:
- Humidity trays filled with water and pebbles
- Plastic domes over pots
- Misting cuttings with water
Temperature
Stable temperatures are essential for propagation. Aim for a range between 65°F and 75°F (18°C to 24°C). Avoid cold drafts or placing cuttings near heat sources, as fluctuations can stress the plants.
Caring for Your Propagated Plants
Once your cuttings have successfully rooted, proper care is key to nurturing their growth. Here’s what to keep in mind:
Initial Care
During the initial stages, monitor the moisture level of the soil. Overwatering can lead to root rot, while underwatering can cause stress. Water only when the top inch of soil feels dry to the touch.
Fertilization
Newly propagated plants should generally not be fertilized until they show signs of new growth, which indicates that they’re establishing roots. Once they begin to grow, you can start with a diluted, balanced fertilizer every 4-6 weeks.
Signs of Stress
Be vigilant for signs of stress, such as yellowing leaves, wilting, or stunted growth. If you notice any issues, assess your care regimen and environmental conditions, adjusting as necessary.
Patience and Observation
Propagation is a waiting game. Understanding the growth cycle of your plants will help you appreciate their progress. Give them time, and enjoy the journey of watching them thrive.
Troubleshooting Common Propagation Issues
Despite your best efforts, issues can arise during propagation. Here are some common problems and solutions:
Rotting
If you notice the base of your cutting is mushy or discolored, it may be rotting due to excess moisture. Reduce watering and ensure proper drainage.
Wilting
Wilting can indicate underwatering or too much sun. Check soil moisture and move the cutting to a shadier spot if necessary.
Stunted Growth
Stunted growth can result from poor soil quality or inadequate light. Ensure your cuttings are in a suitable growing medium and receiving enough light.
Pests and Diseases
Keep an eye out for pests like aphids or spider mites. If you spot any, treat them promptly with insecticidal soap or neem oil. For fungal issues, ensure your tools and pots are clean and sterilized.
Starting Over
Sometimes a propagation attempt may simply fail. If you notice persistent problems despite your efforts, it may be time to consider starting anew with a fresh cutting.
Celebrating Your Indoor Garden: Tips for Long-term Success
Once your propagated plants have rooted and are thriving, it’s time to transition them to their permanent homes. Here are some tips for long-term success:
Transitioning Plants
When moving your new plants to larger pots, provide fresh soil and ensure they have adequate space to grow. Gradually acclimate them to their new environment, especially if they’re moving from a high-humidity area.
Ongoing Care
Continue to monitor light, humidity, and watering needs as your plants grow. Regularly check for pests and diseases, and adjust your care routine as necessary.
Engaging with the Community
Joining indoor gardening groups or forums can provide valuable support and inspiration. Sharing your experiences and learning from others can enhance your skills and deepen your love for plants.
Experimenting with New Techniques
Don’t be afraid to try propagating different plant varieties. Each plant has its unique needs, and experimenting can lead to exciting discoveries and successes.
Conclusion: Nurturing Your Green Thumb This Autumn
Indoor plant propagation is a rewarding journey that allows you to cultivate your green thumb and expand your indoor garden. As autumn sets in, take advantage of this optimal time to propagate a variety of plants. Embrace the learning process, and remember that each success and failure is a step towards becoming a more skilled indoor gardener.
We invite you to share your experiences with propagation, whether it’s a triumph or a lesson learned. Connecting with other indoor gardening enthusiasts can provide valuable insights and foster a supportive community for all plant lovers.
| Element | Small Space Solution | Benefits |
|---|---|---|
| Furniture | Multi-functional pieces | Saves space |
| Storage | Vertical solutions | Maximizes wall space |
| Decor | Minimalist approach | Reduces visual clutter |
Frequently Asked Questions
What is the best time of year to propagate indoor plants?
The best time to propagate most indoor plants is during their active growth phase, which typically occurs in spring and autumn. Autumn is particularly favorable as cooler temperatures and shorter days can encourage root development without stressing the plant.
How long does it take for cuttings to root?
The time it takes for cuttings to root can vary widely depending on the plant species and propagation method. Generally, cuttings can take anywhere from a few weeks to several months to develop roots. Patience is key, so be sure to monitor their progress regularly.
Can I propagate all indoor plants from cuttings?
Not all indoor plants can be propagated from cuttings. While many common houseplants, like pothos and spider plants, are easily propagated this way, some plants, like certain cacti or large trees, may require different methods such as division or layering.
What should I do if my cutting isn’t rooting?
If your cutting isn’t rooting, first ensure it has the right environmental conditions, including light, humidity, and temperature. Check for signs of rot or pest damage, and consider restarting with a fresh cutting if necessary.
How do I know when to transplant my propagated plants?
You should consider transplanting your propagated plants once they have established a strong root system and show new growth. If the roots are visibly growing out of the pot’s drainage holes or the plant looks top-heavy, it’s time to move them to a larger pot for continued growth.