
Introduction
Spring is a season that embodies renewal and creativity, a time when nature bursts back to life with vibrant colors and fresh scents. As the days grow longer and warmer, many of us feel inspired to revamp our style, and what better way to do that than through the art of nail design? Nail art has become a popular medium for personal expression, allowing you to showcase your personality and creativity right at your fingertips. In this article, we’ll explore the world of DIY French nail art, focusing on spring-inspired designs that will elevate your nail game. Get ready to unleash your creativity and transform your nails into a canvas of beautiful styles!
“Creating a cozy reading nook is all about maximizing comfort in a small space. It’s about intentional design that serves both function and feeling.”
– Interior Design Magazine
Understanding French Nail Art
French nail art is a classic technique that features a natural-looking base color with a contrasting white tip. This style has stood the test of time due to its elegant appeal and versatility, making it a go-to choice for many occasions. Originally popularized in the 1970s, the French manicure has evolved over the years to include various colors and designs, allowing for more personalized expressions.
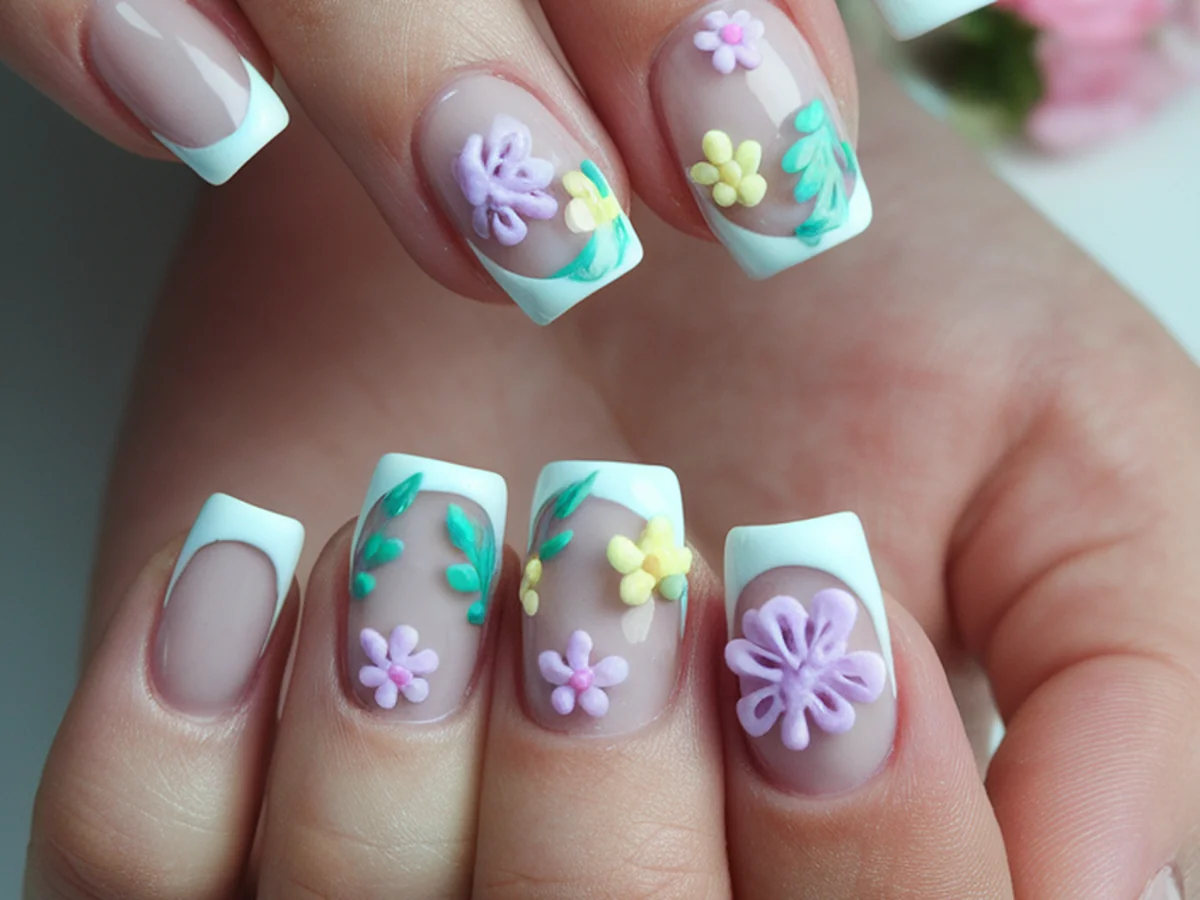
Unlike other nail art styles that may incorporate intricate patterns or bold colors, French nail art is often characterized by its simplicity and sophistication. However, that doesn’t mean it has to be boring. Incorporating seasonal themes, like spring motifs, can breathe new life into this timeless design. Think of delicate florals, soft pastels, or even playful patterns that reflect the joy of the season.
Essential Tools and Materials
Before diving into DIY French nail art, you’ll need to gather some essential tools and materials to ensure a smooth process. Here’s a list of what you’ll need for your spring-inspired nail art:
| Tool/Material | Purpose | Recommended Brands |
|---|---|---|
| Nail Brushes | For detailed designs and clean lines | O.P.I, Sally Hansen |
| Dotting Tools | For creating dots and intricate patterns | Born Pretty, Nimble Nail Art |
| Nail Polish | Base, tip, and design colors | Essie, China Glaze |
Additionally, don’t underestimate the importance of a high-quality base and top coat. A good base coat protects your nails and enhances the polish’s longevity, while a top coat provides a glossy finish and seals the design. For those looking to add a touch of flair, consider optional embellishments such as stickers, rhinestones, or stencils to elevate your nail art even further.
Choosing Your Spring Color Palette
Selecting the right color palette is crucial for creating stunning spring nail designs. This season, think soft pastels and vibrant floral tones to reflect the beauty of blooming flowers and lush greenery. Colors like pale pinks, mint greens, lavender, and soft yellows are particularly on-trend and perfect for evoking the essence of spring.
When choosing colors, consider complementary shades that can harmoniously blend together. For example, pairing a soft pink base with a bright lavender tip can create a delightful contrast. You can also experiment with mixing and matching colors to create a unique design that represents your personal style.
Incorporating seasonal motifs such as flowers, leaves, and even butterflies can further enhance your spring nail art. These designs can be as simple or intricate as you desire, making them a great way to express your creativity.
Step-by-Step Guide to Classic French Tips
Now that you have a solid understanding of the tools you’ll need and the colors to choose from, it’s time to dive into the classic French tip application. Here’s a step-by-step guide to help you achieve the perfect look.
1. Preparation: Start by ensuring your nails are clean, filed, and shaped to your liking. Use a gentle nail buffer to smooth the surface and push back your cuticles for a polished finish.
2. Base Coat: Apply a quality base coat to protect your nails from staining and to provide a smooth canvas for your polish. Allow it to dry completely.
3. Choosing the Tip Color: Select a color for your tips. Traditionally, white is used, but feel free to experiment with colors that fit your spring theme.
4. Creating the French Tip Line: Use a fine nail brush or a nail striping tape to guide your line. Carefully paint the tips of your nails, aiming for a smooth, curved line. If you make a mistake, simply clean it up with nail polish remover on a small brush.
5. Finishing Touches: After your tip color has dried, apply a top coat to seal your design and add shine. This will not only enhance the look but also help your manicure last longer.
Incorporating Spring Designs into French Nail Art
Once you’ve mastered the classic French tip, it’s time to get creative by incorporating fun spring designs. Here are some ideas to inspire your next manicure:
– Floral Patterns: Flowers are synonymous with spring. You can use a fine brush to paint small flower designs or even use dotting tools to create floral shapes. Consider using a pastel base with white or bright floral accents for a fresh look.
– Negative Space: A modern twist on the French tip is to leave negative space on your nails, allowing your natural nail to show through. This can create a chic and minimalist look while still keeping the essence of French nail art.
– Seasonal Symbols: Incorporate other spring motifs like butterflies, bees, or ladybugs. These can be painted on or added as decals for easy application.
– Blended Designs: Try blending techniques like ombre or stripes to add more flair to your French tips. For instance, create a gradient effect using two or three shades that meld into one another for a stunning visual effect.
Advanced Techniques for Unique Styles
If you’re looking to elevate your nail art further, consider exploring advanced techniques. Here are a few that can help you create unique styles:
– Nail Art Stamping: This technique involves using specially designed plates and a stamper to apply intricate designs to your nails. It’s a fantastic way to achieve detailed patterns without the need for a steady hand.
– Water Marbling: For a creative edge, water marbling allows you to create beautiful swirls of color right on the surface of the water. Dip your nails into the design for a striking and artistic effect.
– 3D Nail Art: Add dimension to your nails with rhinestones, beads, or other embellishments. This technique can make your nails stand out and adds a luxurious touch, especially for special occasions.
– Gradient Effects: To create a sophisticated look, try gradient effects using a sponge. This technique allows you to blend colors seamlessly, giving your nails a soft and dreamy appearance.
Nail Care Tips for Maintaining Your Designs
While creating beautiful nail art is exciting, maintaining its longevity is key to enjoying your designs for as long as possible. Here are some essential nail care tips:
1. Nail Health: Always prioritize nail health. Keep your nails moisturized and avoid using them as tools to prevent breakage. Regularly apply cuticle oil to keep the surrounding skin hydrated.
2. Quality Products: Use high-quality nail products to ensure your designs last. Invest in a good base and top coat, as they can significantly affect the durability of your manicure.
3. Extension of Art Life: To extend the life of your nail art, avoid exposing your nails to harsh chemicals and excessive water. Wearing gloves while doing chores can help protect your manicure.
4. Touch-Up Signs: Watch for signs that it’s time for a touch-up, such as chipping or fading. If your tips start to wear down, consider adding a fresh coat of top coat or reapplying the tip color to refresh the look.
Inspiration and Resources for Further Creativity
If you’re eager to continue your nail art journey, there’s a wealth of inspiration and resources available online. Here are a few platforms and communities you can explore:
– Pinterest: A treasure trove of nail art ideas where you can discover countless designs and techniques.
– Instagram: Follow influential nail artists to stay updated on trends and gain inspiration for your next DIY project.
– Nail Art Challenges: Participate in seasonal nail art challenges to push your creativity and connect with other enthusiasts.
Sharing your creations on social media can also inspire others and foster a sense of community among nail art lovers. Be sure to use relevant hashtags to get your designs noticed!
Conclusion
Creating your own nail art is not only a fun and creative outlet but also a wonderful way to express your individuality. With the arrival of spring, there’s no better time to experiment with fresh designs and vibrant colors that reflect the beauty of the season. From classic French tips to intricate floral patterns, the possibilities are endless.
So gather your tools, select your colors, and let your imagination run wild! Don’t forget to share your stunning creations with friends and on social media to inspire others in their nail art journey. Remember, nail art is all about experimenting and finding your unique style, so have fun and enjoy the process!
Frequently Asked Questions
What is a French manicure?
A French manicure is a nail art style characterized by a natural base color with distinct white tips. It’s known for its elegance and versatility, making it a popular choice for both casual and formal occasions. Over the years, it has evolved to include various colors and designs, allowing for personal expression.
How can I make my nail art last longer?
To extend the life of your nail art, use a high-quality base and top coat, and avoid exposing your nails to harsh chemicals or excessive water. Regularly applying cuticle oil and keeping your nails moisturized can also help maintain their health and longevity.
What are some popular spring colors for nail art?
Popular spring colors include pastels like pale pink, lavender, mint green, and soft yellow. Bright floral tones and earthy greens are also trending, reflecting the vibrant nature of the season. Mixing and matching these colors can create stunning designs.
Can I do nail art at home without professional tools?
Absolutely! While professional tools can enhance your experience, you can easily create beautiful nail art using household items. For example, a toothpick can serve as a dotting tool, and tape can help with clean lines. Creativity is key!
Where can I find inspiration for nail art designs?
Platforms like Pinterest and Instagram are fantastic resources for finding inspiration. You can also explore nail art blogs and YouTube channels where artists share tutorials and design ideas. Engaging in nail art communities can further spark your creativity.